I have a 2018/2019 (sometime around there) 15" MacBook Pro, and installed Windows 10 through a USB, making it a solely Windows machine with Bootcamp support software. I'm wondering how I can upgrade to Windows 11 as it requires TPM 2.0. I'm not sure I can create a bootable USB using Rufus as I read somewhere that Bootcamp's support tools affect the installer and otherwise won't work, so I'm not sure where to go from here.
Asked
Active
Viewed 795 times
1 Answers
4
Microsoft officially acknowledges Windows 11 can be installed on computers which do not have a TPM.
So far, I have been able to install Windows 11 on the following Intel Macs:
- 2018 Mac mini
- 2013 iMac
- 2011 iMac
- 2007 iMac (After upgrading to 4 GB of memory)
I used this answer to install on the 2011 through 2018 Macs. I have yet to post how I installed on the 2007 iMac, but the steps are based on answers to this question.
Basically, the GUI which comes with the Windows 11 installation software (setup.exe) will block the installation of Windows 11 on Mac computers. Some alternative methods to bypass this are given below.
Microsoft GUI Installer Method
Use the GUI installer supplied by Microsoft. This will require editing the registry. I have only tested this using a VirtualBox virtual machine to install from the Win11_23H2_English_x64v2.iso file downloaded from Microsoft. I pressed the shift+F10 key combination when the display below appeared. This opened a Command Prompt windows where I entered the command regedit.

The registry changes I made are documented in the article "How To Install Windows 11 On Mac For Free With Boot Camp" and are repeated below.
▪ In the Command Prompt Window type: “regedit” to open the Registry Editor in Windows 11.
In the Registry Editor browse to HKEY_LOCAL_MACHINE\SYSTEM\Setup. Right click on the Setup folder and select New > Key.
Set a new name called LabConfig for the key and right click on it. Select New > DWORD (32-bit) and give it the name BypassTPMCheck.
▪ You must then repeat the above process to bypass the RAM check and Secure Boot check respectively by naming the keys ByPassRAMCheck and BypassSecureBootCheck.
▪ The final step is to double click on these three values you have created and set them to “1”.
The resulting additions are shown below.

Next, close the Registry Editor and Administrator: X:\windows\system32\cmd.exe windows and proceed with the installation of Windows.
The Command Line Interface (CLI) Method
Install using the command line interface (CLI) supplied by Microsoft. This involves using the DISM command from Microsoft. the procedure in document in this answer.
Creating a USB Bootable Windows 11 Installation Flash Drive.
I suppose you can try using Rufus or Microsoft's media creation tool to aid in creating a Windows 11 install ISO. Note the Microsoft often releases two different versions of the installation software. One has the file \sources\install.wim and the other has \sources\install.esd. For Windows 10 installations, Apple has always recommended ISOs with \sources\install.wim. The Windows 11 equivalent ISO can be downloaded from here. Below are the steps for creating a bootable Windows 11 installer flash drive for your Mac. Here, I assume you already have the correct Windows Support Software from Apple.
- ExFAT format a MBR partitioned flash drive.
- Copy the files from the mounted Windows installer ISO file to the flash drive. You can download the ISO from here.
- Copy the Windows Support Software to the flash drive. The
BootCampand$WinPEDriver$folders should appear in the root folder of the flash drive.
The WinNTSetup Method
Use a third party GUI such as WinNTSetup. I have not determined a way to verify this software can be trusted. So, user beware!
The author of this software is JFX who posts on MSFN. On February 13, 2024, a post by JFX was edited. Below is a excerpt from this post.
So, I will assume the above links are to official releases of WinNTSetup. Beware, there many websites offering downloads of WinNTSetup versions, where a few files have been either changed or removed. The file names for various versions of WinNTSetup are given below. The current version as of February 2024 is 5.3.4.
| WinNTSetup Version |
Mega and MediaFire Filename |
|---|---|
| 5.2.5 | WinNTSetup_v425_Legacy_Supports_32-64Bit_Win_XP_Vista_7_8.x_10.rar |
| 5.3.2 | WinNTSetup_v532.rar |
| 5.3.3 | WinNTSetup_v533.rar |
| 5.3.3a | WinNTSetup_v533a.rar |
| 5.3.3b | WinNTSetup_v533b.rar |
| 5.3.4 | WinNTSetup_v534.rar |
The table of the SHA-256 value for each file is given below.
| WinNTSetup Version |
SHA-256 Value of .rar File |
|---|---|
| 4.2.5 | 777d48083e559ef1a57f48ce74bf58ec6b2f64ecd5a62c039e611d2a69a38fc3 |
| 5.3.2 | 4775b789b7df7c4a4d82307695ddd39467b67393edb8b466db8b9e1bd1b6c05e |
| 5.3.3 | f3be4aac9741d295c680457ea07705da4e974b984857e8bd7a545b460baf73b0 |
| 5.3.3a | daaaf975a7eb563da3afee537c091d1a0b80aff402fd2a60a8b9c3a831772b61 |
| 5.3.3b | e62943cc41d8d61b3e158100165c738bcf4816ffe18329b8ec788246ff386588 |
| 5.3.4 | 4bec7fb6c5e05f8e7d2482120ecb79ca6e4c8aa51f90a877a681a52c756311d0 |
Below is an example of using OS X/macOS to get SHA-256 value.
shasum -a 256 WinNTSetup_v534.rar
4bec7fb6c5e05f8e7d2482120ecb79ca6e4c8aa51f90a877a681a52c756311d0  WinNTSetup_v534.rar
I used macOS Catalina to extract the files from WinNTSetup_v534.rar. This first required downloading the 7-Zip archive file named 7z2400-mac.tar.xz from the following source. This file contains 7-Zip for macOS (arm64 / x86-64).
The following commands were used to extract the files.
cd ~/Downloads
xattr -dr com.apple.quarantine 7z2400-mac.tar.xz WinNTSetup_v534.rar
mkdir 7zip
tar -xf 7z2400-mac.tar.xz -C 7zip
7zip/7zz x WinNTSetup_v534.rar -oWinNTSetup_v534
Steps to Download Windows 10 ADK into WinNTSetup 5.3.4
Note: If WinNTSetup 5.3.4 will be used with a 64‑bit bootable Microsoft Windows 10 or 11 installer, then these skips can be skipped.
Extract the files from the
.rardownload to a folder namedWinNTSetup_v534on a machine running Windows. I tested using 64‑bit Windows 10 Pro version 22H2 installed as a VirtualBox guest on a 2013 iMac running macOS Catalina 10.15.7. Since VirtualBox is a free product and Microsoft will allow free installations of Windows 10 for short periods of use, I did not have to make a purchase. Afterwards, I deleted the virtual machine.Open the
WinNTSetup_v534folder. The contents are shown below.
Right click on the
WinNTSetup_x64application and select "Troubleshoot compatibility", as shown below.
Select "Troubleshoot program", as shown below.

Select "I don't see my problem listed" followed by the "Next" button, as shown below.

Select "Windows 7" followed by the "Next" button, as shown below.

Select "Test the program…", as shown below.

Select the flashing shield on the taskbar, as shown below.

On the "User Account Control" popup, select the "Yes" button, as shown below.

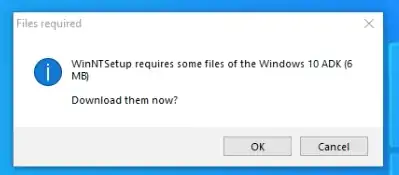
On the "Files required" popup, select the "OK" button, as shown below. If you do not see this popup, then most likely the files have already been downloaded.

Below is a snapshot taken while the download was taking place. The required files are automatically added to the folder.

After the files are finished downloading, close the application titled "WinNTSetup 5.3.4", as shown below.

In the "Program Compatibility Troubleshooter" window, select the "Cancel" button, as shown below.

Close the "WinNTSetup_v534" folder. as shown below.

Either add the folder to the Microsoft Windows 7, 8, 8.1, 10 or 11 installation media or to separate media. For example, if installing Windows in a virtual machine where the Windows installation media is an ISO file, then the folder should be converted to a separate ISO file. The virtual machine would then need an additional optical drive to hold the virtual DVD represented by this new ISO file.


Steps to Download Windows 10 ADK into WinNTSetup 4.2.5
The installer application included with recent versions of WinNTSetup is 64‑bit. The last WinNTSetup version, which included both 32‑bit and 64‑bit versions of the installer application, is 4.2.5. During testing, I found this version could be used to install Windows 11 23H2, when booting from Microsoft Windows 7, 8, 8.1 or 10 installation media.
Note: To use version 4.2.5 with the Microsoft Windows 7, 8 or 8.1 installation media (ISO, flash drive, DVD or other), you will first need to download and install Windows 10 ADK files to the folder extracted from the
.rarfile. For Windows 10 or 11, you can skip these steps. If you skip these steps, then you will be prompted to download while installing Windows. In the case of a Windows 10 installation, you can select theCancelbutton and proceed with the installation.
Extract the files from the
.rardownload to a folder on a machine running Windows. I tested using 64‑bit Windows 10 Pro version 22H2 installed as a VirtualBox guest on a 2013 iMac running macOS Catalina 10.15.7. Since VirtualBox is a free product and Microsoft will allow free installations of Windows 10 for short periods of use, I did not have to make a purchase. Afterwards, I deleted the virtual machine.In the folder, open either the
WinNTSetup_x64.exeforWinNTSetup_x86.exeapplication. When the following popup appears, select "Yes".
When the following popup appears, select "OK". If interested, more information on the Windows Assessment and Deployment Kit (Windows ADK) can be found here.
Below is a snapshot taken while the download was taking place. The 32‑bit and 64‑bit required files are automatically added to the folder.

When finished downloading and installing, the main display for the application will appear, as shown below.

Quit the application.
Either add the folder to the Microsoft Windows 7, 8, 8.1 or 10 installation media or to separate media. For example, if installing Windows in a virtual machine where the Windows installation media is an ISO file, then the folder should be converted to a separate ISO file. The virtual machine would then need an additional optical drive to hold the virtual DVD represented by this new ISO file.


David Anderson
- 40,244